Welcome To Coaches Education


    Email


.  
 

10 P.E. Lessons Plans for Track & Field
In The Classroom

Article By: John Tansley

Plan for the High Jump

SAFETY TIPS
- Be sure the HJ pit is properly assembled with the sections strapped together and the landing pad attached
- Be sure the take off approach is a clean surface with good footing.
- Spot all drills in the beginning to insure participants land in the pit.

EQUIPMENT SET UP
High jump pit
HJ standards
Elastic or standard crossbar
  ADDITIONAL MATERIALS
athletic tape


CLASS ACTIVITIES

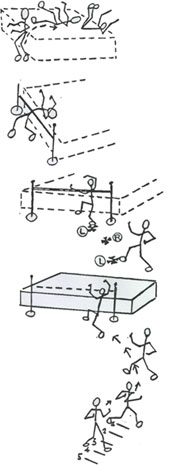
1. Practice jumping and landing on the back:
Have
students form a line up to the front of the HJ pit. Standing with their backs toward the pit and their heels a foot or so away, one-by-one have them jump backwards off both feet and land on their mid to upper backs in the pit. Instruct them not to look back, but to watch their hands and feet in the air and do a backwards roll in the pit if they can. (The first time through, spot jumpers by placing your hand in the small of the back to be sure they land in the pit.)

2. Practice jumping and clearing a bar:
Place an elastic or standard crossbar on the HJ standards at about the same height as the top of the pit (2-feet). One-by- one, have students jump backwards off both feet, lift their legs over the bar, and do a backward roll in the pit.

3. Determine the take-off foot:
Almost all right-handed students will take-off from the left foot, and vice versa. Instruct students who kick a ball with the right leg that they should take off from the left foot on the right side of the landing pit... and vice versa.

4. Practice the run-up and jump:
Place 3 pieces of athletic tape 4-feet apart on the approach area leading to the pit. One-by-one, have each students lined up on the right side of the pit stride forward and hit the 1st tape mark with the left foot, the 2nd tape mark with the right foot, the 3rd with the left ... take-off and step up onto the pit. Have students lined up on the left of the pit do the same ... right-left-right up onto the pit.

 
5. Practice the run-up and jump, landing on the back:
Hitting the 3 pieces of tape on the approach, have each student run up one-by-one, jump off one foot ... look away from the pit ... and land on the back with hands and feet in the air.
 
 
6. Practice the run-up, jump, and clearing a bar:
Add another piece of tape to each approach for a 3-step run-up. Put the crossbar in place, and repeat step-5 emphasizing a double-arm drive up. Jumpers should hold the 'away arm' back on the final stride into take-.off.
 
 
7. Practice jumping with an extended run-up:
A full run-up should be in the form of a "J", with 4-strides in a straight line and 4-strides on a curve into the take-off. As they practice, move students forward or back so they take-off 2-3 feet from the crossbar.
 

Lesson 2:
Plan for the Shot Put


International Copyright © of CoachesEducation.com. All Rights Reserved.
Reproduction in whole or in part in any form or medium without express written permission
of
CoachesEducation.com is strictly prohibited.